
A friend of mine sent me this link. Do with it what you and an electric igniter will.
Tag Archives: DIY
How would you………
Hypothetical situation: you have a piece of property that is uneven ground and you have a 40′ conex (empty) sitting on it. Your goal is to move it to a different location a couple hundred yards away through the brush, not necessarily a straight line journey. Assume that trees, stumps and the like are not an obstacle but depressions, slopes, uneven terrain, etc. are. You can only use hand -tools including Hi-lifts, pulleys, ropes, jackstands, etc…anything except a Bobcat, forklift, frontloader, or other vehicle.
How would you do it?
I know there are trucks you can mount under either end of a conex to put them on wheels but that is mitigated somewhat by the uneven overgrown terrain. Assume no more than three or four people to work this task.
Suggestions?
ETA: a portable 12v winch is an option in this scenario. Something that can be carried in, along with a couple 12v batts.
Beretta G conversion
Broadly speaking, when it comes to 9mm handguns, I’m a Glock guy. This doesn’t mean the Glock is my favorite 9mm handgun…it isn’t. My favorite 9mm handgun is the HiPower. But the Glock has he qualities that I look for in terms of a tool for looking out for Number One.
I do have a stable of other guns, though. One of them is the Beretta 92 (or M9, if you prefer.) Because of it’s military ubiquity it seemed a good idea to have a couple. The 92 goes back to the wondernine school of handgun design where you had a heavy double action pull and subsequent rounds were single action. Additionally, you had a manual safety. The manual safety is the part that makes no sense to me…it has a heavy double action pull like a revolver, so why does it need a manual safety?
Beretta addressed this by making the ‘G’ series where the safety is mechanically rendered into a decock-only. Thumbing the safety decocks the gun and the safety then springs back to the ‘fire’ position. In this way you never have to worry about your safety accidentally getting engaged when you don’t want it to.
Fortunately the necessary parts to convert your Beretta to the G version are available for about fifty bucks. The instructions, as provided by Beretta, are awful. YouTube to the rescue.
Sadly, no matter how you slice it, the whole experience is still a springs-flying-across-the-room and need-three-hands experience. But…it’s done.
I can’t recall the last time I encountered anyone carrying a DA/SA pitol that had a manual safety. The heavy DA is the safety. I find them to be useless and will modify a pistol to decock-only if I can.
Anyway…took a half hour but now both my M9s are decocker-only.
Plastic container prep
A few posts back I mentioned that I had bought a new bunch of Scepter water cans.
 Any new plastic container is going to have ‘that plastic smell’. Also, you don’t know where that container has been or what its been exposed to in its time at the warehouse. So, the smart survivalist will clean these things out if for no other reason than to at least get rid of that unappealing strong plastic smell.
Ten bucks up at CostCo gets you about 14# of baking soda. You don’t need 14# of baking soda to wash out a water jug, but more is better, right? I err on the side of overkill, so I fill a gallon pitcher with hot water, dump in about a cup of baking soda, stir well and dump it into the water jug. Seal it up loosely so water can escape a bit and get the threads of the cap. Shake vigorously, shake some more, and then finally shake it vigorously. I give it about 30 seconds of violent shaking so I can feel the water hitting all the sides of the jug. Don’t be gentle.
Now, if you’re just doing one jug, you can dump out the mix and then rinse the thing out thoroughly with cold water from a hose. But, since I’m doing more than one, I’ll dump the mix into the next jug and repeat the process. I’ll do this for two or three jugs and then use some fresh baking soda/water mix.
Keep in mind, when you dump the water/soda mix out of the jug it will leave traces of baking soda on the inside that will eventually dry to a powdery film. This is why the rinse with clear cold water afterwards.
By this method I either totally eliminate the plastic smell, or reduce it to virtually nothing. And, of course, I’ve now cleaned out the inside of the jug. If you’re a suspenders-and-a-belt guy you may want to disinfect or sterilize the jug afterwards. Thats pretty much the same process but using water/bleach instead of water/baking soda.
And, finally, when it’s time to fill these things you can add all sortsa ‘water preservers’ or bleach to promote storage life. Its my understanding that municipal water (“city water”) is fine to store right out of the tap since it has already been treated by the municipal water provider.
I should also point out that I do this for any large plastic container that I am storing something edible in. My buckets for rice, wheat, etc., also get this treatment. In that case it is imperative that you make sure the bucket is completely bone dry before you fill it with your food product. After cleaning I usually let the bucket/container sit in a dry place indoors for a few days to completely dry out.
Can I get away with not doing any of that and just fill the things up without going through that effort? Absolutely. But this is stuff you’re putting away for a rather dire circumstance. When that dire circumstance occurs (or is occurring) aren’t you going to want every confidence and advantage possible? Of course you will…so spend the ten minutes and do the work. Future you will thank you.
MacGyver is my spirit animal
Well, its been hovering around -15 the last couple days and, despite my best efforts: frozen pipe.
The hot water pipe to my kitchen sink appears to have frozen. Now, this is an old house (ca.1915~) so getting into the walls isnt really a thing unless you wanna have big repair job afterwards. So, what to do?
Well, first thing I did was head to the basement and put the kerosene heater in the area that I believed was right below the frozen area. No joy. Let it run all day and still no water.
Alright, next step was to take a small electric space heater, put it in the space under the sink and close the cabinet doors. Let that run all night. No joy.
At this point I’m rather irritated and somewhat worried. How do you heat a section of wall without setting fire to the house or having to rearrange everything?
As it turns out, there is a small hole in the wall in the cabinet below the sink. The drainpipe for the sink has a small opening next to it from a plumbing nightmare a few years ago. Could I somehow pipe hot air into that opening and heat the wall from the inside?
I channeled my inner MacGyver……”Talk to me, Goose Mac..”
One hair dryer + one roll of packing tape + one empty cardboard tube from Christmas wrapping paper = intrawall heat injector:
 Took one minute to put it together, and five minutes for it to work and get the water flowing again. (And 24 hours to come up with the idea after exhausting other ideas.) Remember, kids: if its stupid and it works, it ain’t stupid.
He was a simp for his gun aversion, but other than that MacGyver had some tolerable survivalist cred.
Sunday outage(s)
This paid off.
Yesterdays power outage was not an anomaly, it seems. Power was out for about an hour today but over a much broader area of town. I went ahead and ran the generator for that hour, mostly because it was just time to unlimber it and let it get some exercise. However, buying the new UPS’ yesterday for the security cams worked perfectly. Cams, monitor, and DVR stayed up quite a while as I fumbled around getting the generator out of it’s Hardigg case and out into the yard. Very pleased.
Just a few blocks away, a friend of mine is without power and has been for an unusually long time….several hours now. I brought over the desklamp/batterybox combo referenced at the beginning of this post and said to go ahead and not even worry about using up the battery...running it six hours a night it’ll last a freakin’ month.
And, should the power continue to be spotty, I also have this little gem I fabbed up on a whim.
Not sure what’s going on locally in regards to this two days of spotty blackouts…Im guessing its something fairly minor…but it does give me an opportunity to test out gear and theories, and it also points out some holes I need to fill. Most notably, a better base-unit-style police scanner…..with UPS, natch.
Propane, and propane accessories
Number one propane accessory: road flares.
It’s a staple of movies. Good guys need an explosion so the McGyver a barbecue bomb and a few road flares into…ah, you know what…its just easier to show you:
Here’s the thing. Propane canisters, like you and I, are under tremendous pressure. Poke a hole and they go off like a rocket. Any ignition source has to be already in place and at full heat or the sudden explosive force of the propane releasing will just shove the propane tank away. So you (usually) need an ignition source on the tank itself that will, if the tank rockets away, go with it.Tracer ammo? Maybe in the movies, but practically it doesn’t seem to go that way. But…let’s look at some folks who have tried:
I actually found several videos of people trying to blow stuff up with propane and tracers and the results are almost never what Hollywood would have you believe. It was a little harder finding videos with people using incendiary, though.
If your End Of The World plan for clearing out a Times Square on New Years Eve size crowd of zombies is to chuck a propane tack at ’em and light it up with tracer ammo. Well…it looks like you’re going to be in for a disappointment. But…securing road flares to your propane tank and shooting it? That seems to deliver…kinda:
What’s interesting is that the propane tanks don’t really explode like they do in the movies. There’s a huge fireball, no doubt…things are gonna get crispy..but there’s no real bowl-em-over concusive explosion. Holes aren’t blown in the ground and other than the tank itself there isn’t any explosive shrapnel a-flying.
This isn’t to say that propane, used creatively, can’t be used for purposes other than running your turkey fryer. Rather it means that if you think firing a round of tracer into a propane tank is some sort of poor mans remote claymore…well…you’re in for a disappointment.
This post brought to you by the five-dollar summer fill-up discount at the local RV place…where I saw way too many propane tanks of all sizes to not have these kinda thoughts.
ETA: ALthough it was a terrible, terrible movie, the gun fu in Sucker Punch was pretty great. Especially against the WW1 Nazi Zombies.
Fuel can tags
I looked for it but couldn’t the post I had about the tags I use for fuel cans. So…let’s do that again.
Here’s the thing: I store my fuel cans outside. Usually under some type of cover, but always outside. Since I try to rotate fuel on a fairly regular basis, I need to know when a particular can of fuel was filled. Any written paper tags would disintegrate from moisture, plastic tags would crack and fade from sun and UV, chalk marks are wildly temporary, and that really leaves only one option – metal tags.
Here’s what I do. It works for me, it might work for you. YMMV.
Tools and materials:
- Pointy thing..nail, screwdriver, etc.
- Empty pop/beer can
- Pair of scissors you don’t mind getting dull
- A few inches of paracord
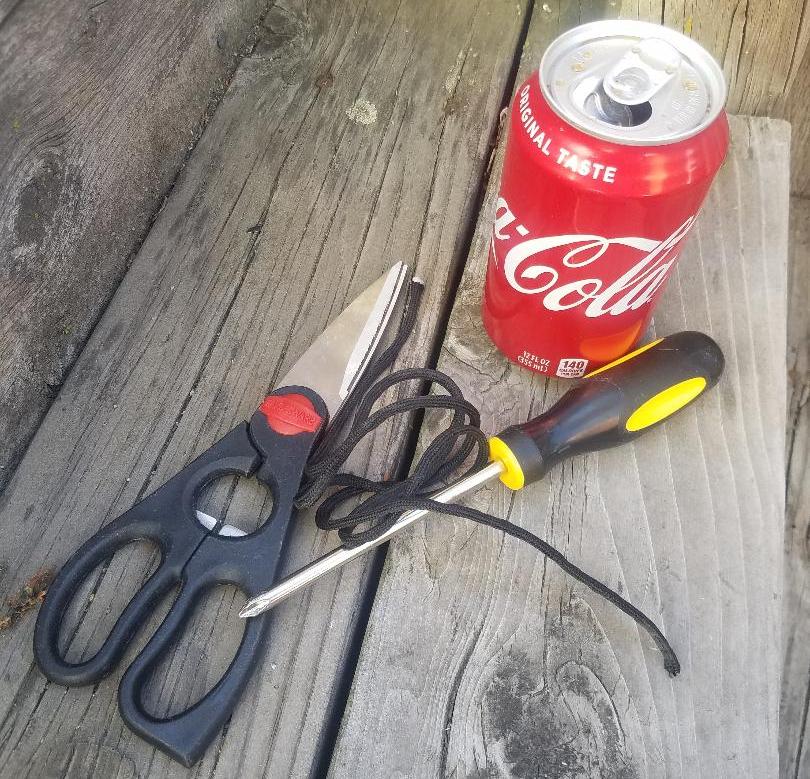 I cut up a pop can and get myself a piece of aluminum about 1″x2″. Pick a size that works for you.
 Put the aluminum flat on a firm but somewhat yielding surface…a piece of wood, a phone book, etc. Using the pointy object, scrive the date into the soft aluminum. Punch a hole in the tag youve just created and loop the paracord through it.
 Tie tag onto fuel can.
 End of story.
I’m sure someone is going to say “I just write the date on a piece of duct tape with a Sharpie and slap it on the gas can. Works fine because I keep my fuel cans in a garage/shed/bunker/etc.” Well yay for you. Thing is, you don’t know with absolute certainty those cans will always be in that sheltered location until such time as you use them. You may have to hurriedly heave them in the back of your truck at 3am on some rainy night, or leave them sitting in the snow for a few hours as you shuttle them to another location, or you may have to store them outside for some reason. Point is, to my way of thinking it makes sense to plan around the more-worse case scenarios. I keep my gas cans as covered and protected as possible…but the real world has a way of throwing a monkey wrench into plans…so, for me: metal date tags that are impervious to sun,UV, moisture, snow, etc. And, yeah, I could ziptie them to the gas cans but then we’re bag to the UV/sun/freezing damage that occurs to plastics…paracord works for me although a true suspenders-and-a-belt guy will use a twist of wire to affix the tags to the can.
This has been your DIY tip for the week.
Sealer replacement
Years ago, I picked up a heat sealer and a selection of mylar bags in various sizes. One of the ideal uses I found for them was to create small, environmentally-impervious first aid kits that could be slipped into a pack, pocket, or pouch unobtrusively. It worked quite well. So well, in fact, that I loaned out the heat sealer and a supply of bags to someone and…never got it back. I’d remind them periodically about it and they’d ignore me. So…lesson learned. It occurs to me that since I have these new small bags to test out I need to put together another few of those small FAKs to put in them. So..since I’m apparently never getting my other heat sealer back, or being compensated for it, I’ll have to order a new one. So..this arrived today. I still had a stash of bags from my last experiments, so I’m good there although if I need more the go-to guys seem to be Sorbent Systems.
Absolutely you cold do something similar with the vacuum sealer but the bags used for that are, in my opinion, not as durable and rugged as the Mylar. However, if you’re not worried about having difficulty opening a layered package, you could achieve great results by vacuum sealing the contents to reduce space, and then sealing the vacuum sealed package in a mylar pouch for protection. Suspenders and a belt…but if you only have one hand you’re gonna have a heck of a time one-handing your way though all that packaging. Gotta weigh the pros and cons, I suspect.
Anyway, to thats my project for the next couple days – put together a few decent small FAKs and seal them up for carry in the new bags. Nothing fancy, but certainly something more comprehensive than just some bandaids and bactine.
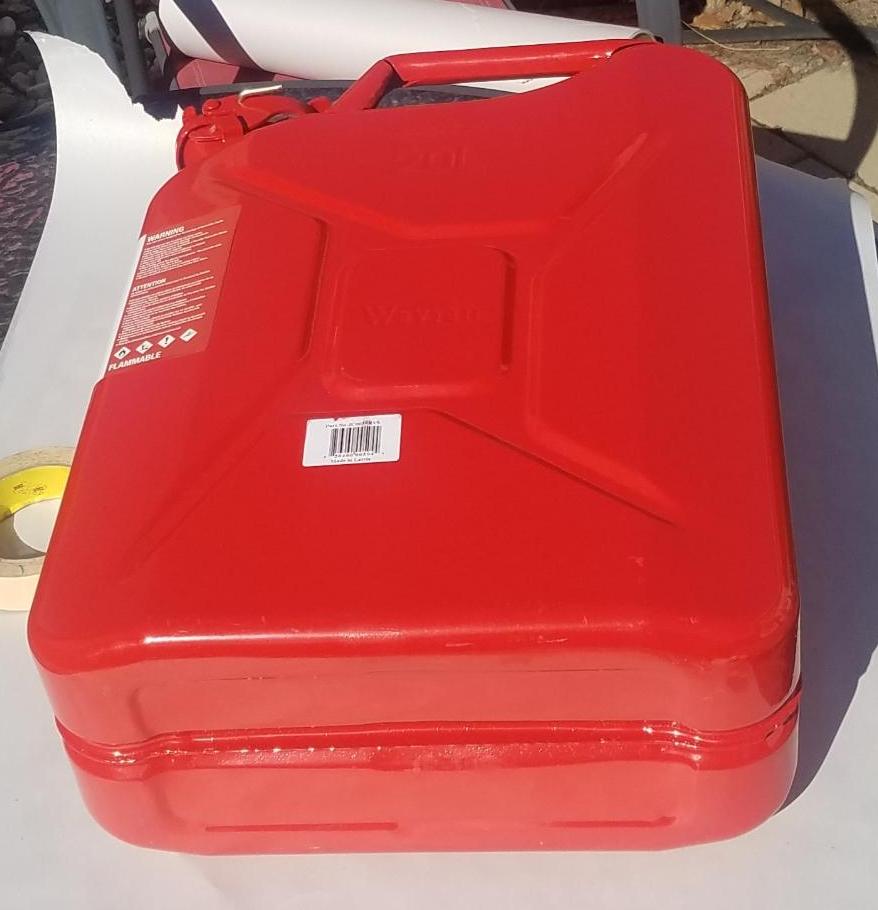
FlexSeal and gas cans
This is turning into quite the series of posts, isn’t it? I’d mentioned that I’d used a spray-coating on the bottom of my gas cans in order to protect the base of the cans from paint-removing scrapes and the resultant rust that would occur. I had done this before the arrival of Flex Seal which is, basically, spray on rubber coating. Seemed logical to go ahead and try it out on the new cans.
So, we take a new can and do a poor job of taping off the edge of where we want to spray:
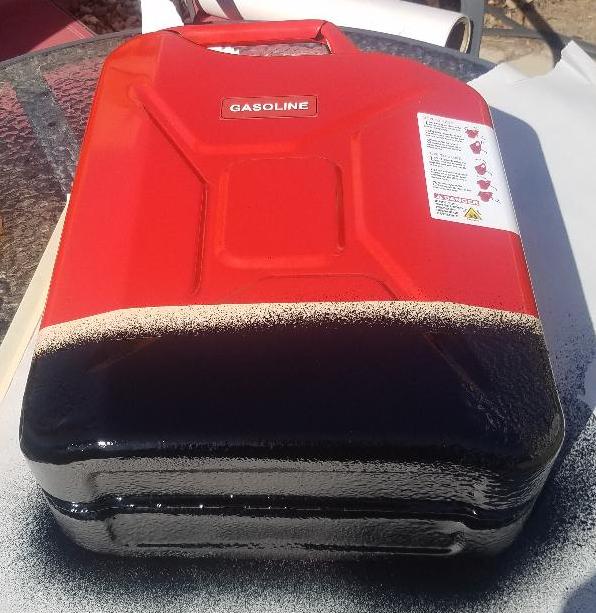 Hit it with a goodly amount of FlexSeal and let it dry:

Seems to be just what the doctor ordered.