Link – https://intershelter.com/

These look very interesting. A couple things jump out at me. First, these seem like they’d be an interesting way to dump a small, easily concealed ‘cabin’ on a piece of remote property. Additionally, since they’re pretty much a ‘kit house’ I’d imagine you can knock it down and transport it if you needed to.

Not sure how much stress the design can handle, but it’d be interesting to use it as a ‘form’ and shotcrete over it or something similar. Byrying it seems unwiae but it looks like it wouldn’t take much to build up some railroad tie berms around three sides of it to make it all but invisible.

Pricing seems reasonable…for about seven grand you can get something that beats being homeless. If a fella had a piece of undeveloped property out in the sticks, this might make a nice weekend cabin sort of thing to hunker down in while you build the primary residence.

Also might make for an interesting ‘dual purpose’ building…plant int on your property as a shed or storage building that can be refitted as temporary housing in a crisis.

As I said, very interesting. I’d like to see one up close.

More LED lighting experimenting

So, if you recall, late last year I had a post up about picking up one of those handy-dandy battery jump-packs at CostCo. They’re a fairly simple, though not perfect, solution for people who are just not inclined, mechanically or motivationally, to whip up their own battery-in-a-box.

After that, I got the curious interest of wondering how long my converted DC LED desk lamp would run on the jump-pack before failing. (The short answer was at least a week 24/7, which, at 6 hours per evening comes out to a freakin’ month of light. Probably more…I quit the program after a week figuring I had enough info.)

It was, to me, a very useful experiment and showed the potential for some tremendous utility from those devices in case of emergency. But…it’s very localized lighting. Its a desk lamp, after all. Which means it’s ‘area of effect’ in terms of illumination isn’t very large. So…what if……….

Was up at CostCo and they have a 4′ LED shoplight that looks similar to the old-style fluorescent shop lights we’re all familiar with. Now, lets state right up front that these were not the really high output LED worklights that are avaialble…for $25 the box says you get about 4000 lumens. Ok, thats fine…what I’m after is the ability to light up a room in a manner that looks virtually identical to what it looks like when the power is on, and not like someone pulled the housing off a MagLight and set it up on a file cabinet in the corner.

Here’s the rub…its set up for AC current, which means that I have to plug it into the built-in inverter on the battery pack. Problem is, the LEDs are DC to begin with…. converting DC (battery) to AC(fixture) to DC (LEDs), as I understand it, isn’t as efficient as if it was just straight DC to begin with. Fortunately, the internet is not without a supply of posts and DIY from people who wanted to do exactly that…. so, I may dig out my snips and electrical tape and see what I can do. But, for now, I’m curious to see how long it’ll run off the battery pack.

I still have these guys sitting here and it would be interesting to put them together to form a self-contained emergency backup lighting system for the storage area where all the emergency gear is.

I have no illusion this thing will run as long as the desk lamp did, but that lamp ran over 168 hours…this thing, on the ther hand, ran for three. Three. I suspect that the actual runtime would be several orders of magnitude longer if it were DC-DC. So….some tinkering is in order.

Watergun: parts arrival

As best I can tell, the missing parts to get the gun ‘shootable’ were a sear, sear pin, and firing pin retaining plate. In other words, these:

I am not a gunsmith by any stretch of the imagination…thats one of the reasons I shoot Glocks – you don’t ‘smith them, you just swap parts. At this point it looks like nothing needs fitting, which is good. But..the proof is in the function. We’ll get to that later. Alright…lets grab a punch, YouTube some disassembly/assembly videos, and get crackin’.

And once thats done…lets hand-cycle it, check the safety and trigger, and just generally play with it. It may look like the slide is a bit stiff but whats actually happening is that I’m trying to rack the slide without moving the gun or my hands out of the frame. Think its easy? Try it sometime.

Yeah, that rear sight is flopping around like Obama on a foreign policy question….but that’s a low priority at the moment. Next step is to take it to the range, tie it down, put a string to the trigger, and shoot the bloody thing.

And the sharp eyed viewer will notice that someone took the magazine safety out. Well, not really….it appears someone welded it to the trigger to deactivate it. :::SMH::: Whatever. Shooting this weekend. Hopefully the slide won’t go sailing through my brainpan.

For those keeping track:

Assuming everything works, and nothing cracks/breaks/explodes/flies off, I’ll send it down the valley for a coating of some kind and then, as the years go by, slowly start replacing parts with premium parts. Kinda make a sweet custom gun with a crappy, but interesting, finish. I’m pleased with how quickly this is coming together. :::Knocksonwood:::

Flare for the dramatic

,Rawles mentioned the a supplier for 26.5mm flares the other day.

Years back, Sportsmans Guide had a deal on genuine HK21A flare guns. As I recall, they were something like thirtyfive bucks or so and I bought a few. At the time there was a goodly amount of 26.5mm Czech flares on the market (26mm will work also). I wound up with quite a variety of projectiles and smoke. Hey, why not? They were cheap(ish) and definitely fun to play with.

Practical? Mmmmm….not sure. But..here’s where they shine – 26.5mm flares are far more…substantial..for your perimeter tripflare warning systems than those rinkydink 12 ga. Olin flares. A quick trip through the plumbing section of Home Depot gets you pretty much everything you need to build a tripflare warning system.

For the more DIY minded, I recall reading a how-to somewhere on the internet about nailing a rat trap to stake, and then attaching the pull chain off some of those Skyblazer flares to the trap bar. Set the trap, it gets triggered, bar snaps down pulling the chain and igniting the flare. Clever.

Of course, thinking about that sort of thing led me down the rabbit hole to how to make other perimeter warning devices using mousetraps. Interesting stuff.


Remember: primers are dangerous and they might ignite things you didn’t want to ignite that were in close proximity to them. So..be careful. Wink, wink, nudge, nudge.

Magnetic stencils

Someone asked about the stencils I was using to mark up the ammo cans and I realized that the post I had about them from years ago apparently got lost in the server migration a few years back. So, let’s rehash it.

20161204_124944

First, this isn’t my idea. Someone told me about it and it seemed like a good idea. I take no credit for it.

Required materials:

Take your stencil, square it on the magnetic business card, trace the outline of the stencil with the Sharpie, and then carefully cut the marked off areas out of the magnetic business card using your xacto. When youre done you have magnetic stencils that are perfect for marking up ammo cans. Just slap ’em on the ammo can and they stay in place all on their own. How cool is that? Slap ’em on the side of the can, give ’em a blast of spray paint, peel ’em off. Voila!

20161206_154741Now, be smart…some letters are going to be needed more than others. Don’t just fab up 10 numbers, 26  letters, and think you’re done. For example, there are two ‘M’s in ‘ammo’, ‘9mm’ and that sort of thing.. And you probably want doubles on all your numbers unless you think you’re never going to need 11,22,33,44,etc.

being magnetic, these things are perfect for marking up ammo cans.

Article – Living in a steel box: are shipping containers really the future of housing?

It takes time to adjust to living inside a steel box. Timothy Ader did not, initially, like the idea of staying at Wenckehof, a student village in Amsterdam made up of 1,000 recycled shipping containers. But three years after moving in, he has no regrets.

“My first impression of the containers was, ‘It’s ghetto stuff – I’m not living there,’” recalls the 24-year-old. “But I started visiting a friend of mine living here and started to like the place. Then I moved in and I realised how good it was. I’m really comfortable in my container and I have a lot of space of my own. I wouldn’t want to live anywhere else in the world right now.”

The notion of living in a converted (or unconverted) storage container is nothing new…you drop into various preparedness forums and you’ll see posts that go way back on the topic. You’ll also see posts from folks who have made their own habitable/storage spaces out of used shipping containers.

The biggest contention on the issue of shipping containers as survivalist retreats is that it seems lotsa folks want to bury them, a’la Terminator 2, and they just ain’t built for that sort of thing. Sure, they stack, but thats because they sit on the corners which are built for just that sort of thing.

I live in a somewhat cold envrion…by the time you pad a shipping container with insulation and the other goodies necessary to handle -20 weather you’re probably better of building a ‘real’ structure. But…I think that fo their original purpose they are ideal. I could see dropping one on a couple concrete piers, and then building up a concrete or forced earth berm on three sides to conceal it and using it as storage at a retreat location. I often wonder if it would make sense to just crib it with lumber and encase the whole thing in a few inches of concrete and rebar, using the container, basically, as a form.

There’s a place down the road from here that sells ‘retired’ containers. They also have the short 20′ ones and those look terribly useful. A fella could probably, with the help of his buddies and a few jacks/winches, manhandle one of those wherever he needs it on his property..in the barn under the hay, in the falling-apart garage under a tarp, or even out in the thick brush, concealed by netting, paint, and timber.

Someday, if I ever get a place in the stick, I’ll probably have a container or two tucked away in some hidden location where I can keep gear, a vehicle, etc. But, in the meantime, the developments in the ‘normal’ communities regarding the development of container-housing construction will come in handy later on. ‘Zon has no shortage of material on the subject….


But by the time you finish framing, cutting out metal, etc, etc, you’re pretty much where you would have been if you had started with a regular cabin built from scratch. Why re-invent the wheel? Check out the military CHU if you want to see what mass-production can do to make a container livable. As expected, Wikipedia has some info on the subject as well. As I read it, the huge amount of containers available is because we import more crap from overseas than we send out…so there are plenty of containers to go around. Since I don’t see that changing any time soon, it makes sense to think of them as a handy resource. If nothing else, they can build a hellaciously cool perimeter wall if you backfill them.

Simple lighting project

This post on arfcom caught my eye. Rather than buy a 12v lamp for use with a battery, this fella converted a regular household AC lamp to run an LED ‘bulb’ off his 12v battery.

This sort of thing intrigued me and I decided to try it. While we have several options for lighting around here, I’d like to have something that doesn’t look like the kind emergency lighting youd find in a stairwell. Something very subtle and ‘normal looking’.

A quick trip to Amazon for the necessary parts:

The next step was to pick up a lamp to experiment on. As it turns out, I found a lamp that already ran on DC (it used a transformer to run off AC house current) and was LED. Since that was 2/3 of the battle right there, I figured I’d start with that.

20150419_164135Reading the details on the made-in-China transformer said, if they can be believed, that power draw was something like .33 amps. 20150419_164052Conveniently, they labeled the wires as to +/-. Simple matter to cut the transformer off and connect the wires for the cigarette plug to the lamp wires…keeping the polarity the same.

20150419_164114


Once the transformer had been removed and replaced with the 12v plug, I plugged it into my old ConSci battery pack to test.

20150421_093016


20150420_224627Unsurprisingly, it works. I’ll tuck it away with the battery box and leave it for the next time I need lighting when there’s no available electricity.

Of course, the bigger plan is to use it in conjunction with the larger battery backup system I’m planning. Nothing fancy..a couple big deep cycle batteries, a smart charger, and a bunch of outlets and wiring to allow me to run emergency lighting and communications for a week or so on battery power. Thats the bigger post Im working on. Gonna be a little while on it, though, since it’s going to take a while to scratch up the cash for the batteries. But…when it’s moved from ‘theory’ to ‘in progress’ there’ll be plenty of posting on it.


Fixing first aid kit foibles

As you may (or may not) remember, a few posts back I described how the first aid kit I left in my bicycle pannier turned into something less-than-optimal as a result of being left out over the winter.

The problem was that it’s a tough balancing act to have a first aid kit in a watertight/airtight container of some fashion but still be quickly accessible with one hand when youre trying to keep all the red stuff inside you. Turned out that the bicycle pannier may not have been nearly as weather resistant as I thought and as a result my first aid kit suffered a great deal of moisture damage. (Although, to be fair, the items that were wrapped in plastic or sealed in foil fared just fine.)

Okay, spring is (somewhat) here and I’m back to riding my bicycle more. Time to replace that first aid kit. On my bike, my needs are simple – I need some stuff to patch up scrapes/cuts/tears from me being suddenly introduced to the road surface by that great facilitator of ouchies – gravity.

An assortment of gauze, pads, bandaids, some tape, and some antibiotic ointment should do it. Lets see what we have:

20150405_120652It’s just for a bicycle accident, not a splenectomy….the skin stapler, betadine and other over-the-top stuff is in the other kit. For the most common boo-boos related to me flying over the handlebars, this’ll handle most of it. Now, to package it up so it stays clean and dry. In this case, we’ll go with a heavy mylar foil resealable bag. With a reasonable amount of care, and a modicum of force, everything fit into the pouch and left enough room to have a bit of extra material to form a seal:

20150405_121911Make sure the jaws of the sealer are hot enough, slide the open end of the pouch between ’em, squeeze jaws shut for a ten-count, and…voila:

20150405_122632I have a rather…exhaustive….supply of first-aid supplies from an episode of eBay purchasing that may have been a bit over-the-top. I’m dead serious…I’ve got something on the order of 9,600 band aids. Since I had to buy the mylar bags in quantity to get a discount, I should probably but together a dozen similar packages, label ’em appropriately, and pass ’em out as Paratus gifts this fall.

Anyway, I’ll toss this in the bag on the bike and be good to go. Should be watertight, airtight, and pretty much impervious to just about any environmental concern.

Remington 870 Dimple Removal

You know ’em, you love ’em…its the Remington 870 shotgun. A fine scattergun that is so widely represented in this country that you’d have to look pretty hard to find a police department that didn’t have them as the ‘standard’ shotgun. Reasonably affordable, well built, and the target of a huge accessory market, pretty much every survivalist has one. (Although, to be fair, Mossberg’s 500 series is probably an extremely close second-place finisher in this.)

A standard accessory that most folks drop onto their 870 is a magazine tube extension. After all, no one ever had a sudden violent emergency and thought ‘man, I wish I had one or two less shells in this thing.’ It used to be that adding a magazine extension was as simple as unscrew magazine endcap, remove old spring and follower, drop in follower and new spring, screw extension onto end of magazine tube…done. Unfortunately, a while back, the guys at Remington, for whatever reason, added two ‘dimples’ in the magazine tube. If you add a magazine extension, the dimples will keep the follower from traveling past those dimples.

Thus, if you want to add an extended magazine to your 870, and your mag tube has those dimples, you’re going to have to remove them. There are two methods for doing this:

  1. ‘Press out’ the dimples. This is often done by shoving a socket (from a socket wrench set) of apprpriate diameter down the magazine tube and using it as an anvil to press out the dimples with a c-clamp or hammer. Sometimes it works, sometimes it doesn’t, and sometimes you have a hell of a time removing that socket from the magazine tube.
  2. Drill out the dimples. Easy, fast, and usually trouble free.

Today, I went with option #2 . (By the way, you can Google ‘remove 870 dimples’ and get a buncha videos on either process.)

First step, unload shotgun, make sure its unloaded, unload it some more, and then, finally, make sure it’s unloaded.

Next up, remove barrel and forend. Easy peasy.

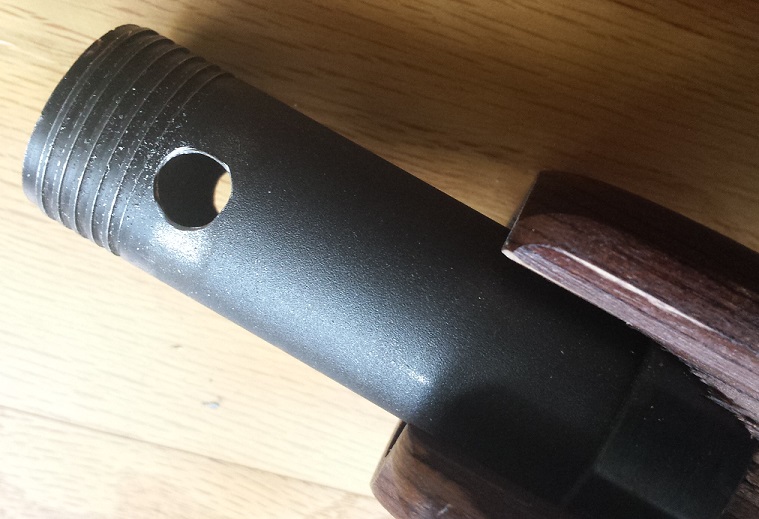
Behold the offending dimples:

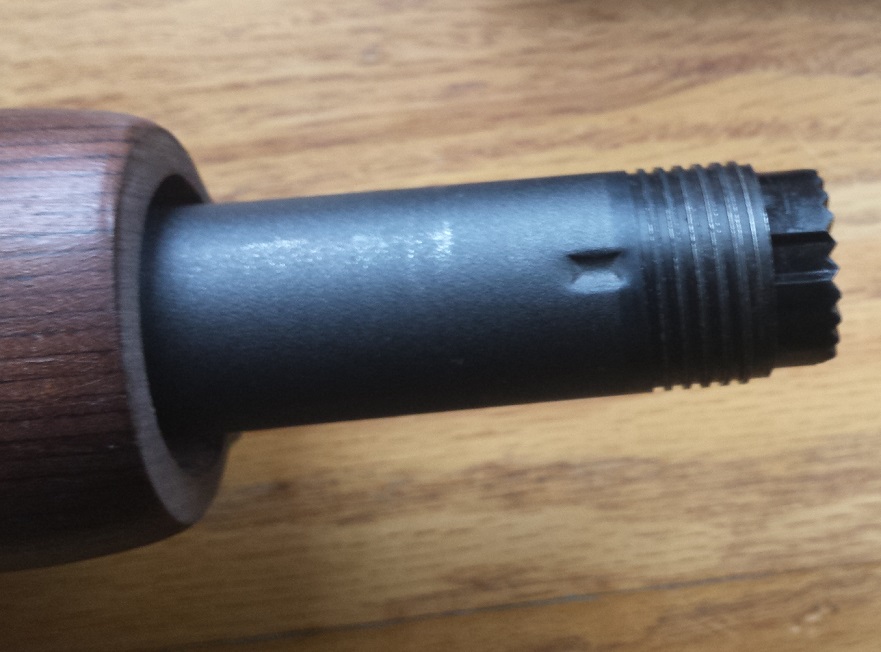
The hated dimple. It’s like some sort of Schumer-Feinstein Speed Bump keeping an otherwise good shotgun from becoming a better shotgun.

The goal is to remove the whole bloody thing. For that, you’ll need a good size drill bit capable of easily and smoothly drilling metal.

20150117_144358

In this case, a 5/16″ bit, centered on the dimple, should be wide enough to do the job.

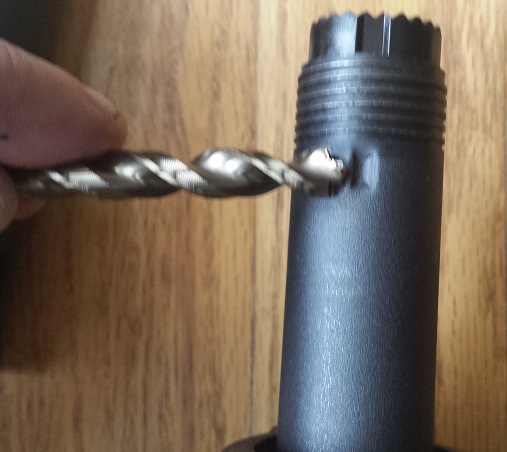
It’s a good bit easier to have someone else hold the gun steady while you get all drilltastic on it, but, if you have no choice, you can do the job solo.

20150117_144931Don’t be an idiot….drill through one dimple, then flip the gun over, and drill the other one. Don’t just drill straight through.

Now, once the drilling is done, you’ve still got some work ahead of you. That magazine follower needs to slide up and down that magazine tube like Sasha Grey on a Vegas stripper pole. So…you’re going to have to polish the inside of the magazine tube where you drilled the holes to make sure there are no rough edges or anything that will snag the magazine follower. There are a couple ways to do this…here’s the easiest. Go grab your Dremel set (aka ‘The Gunsmiths Friend’) and pull out one of those sanding/polishing drums. The holes you drilled aren’t so far down the magazine that you can’t reach them with the Dremel. I already had my drill out so I just chucked the Dremel bit into the drill.

20150117_145123
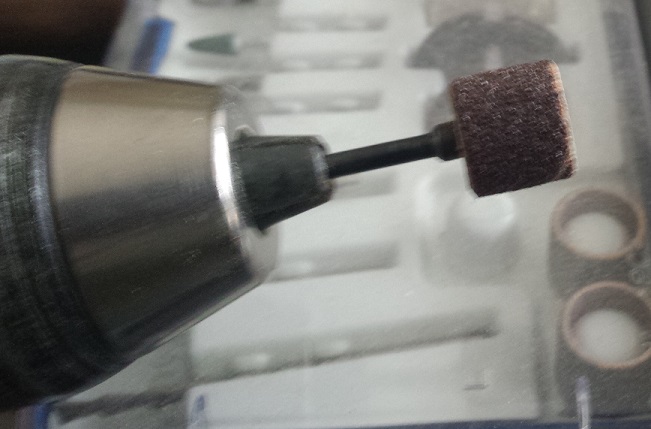
Spin it up, get in there, and start polishing. You want to remove any jagged bit of metal from the drilling process. You want absolutely no jagged edge, lip, or raised metal from where the drill bit passed through the metal. You can’t really overpolish things, so go to far rather than not far enough.

When finished, I ran a 12 ga. BoreSnake through the mag tube a bunch of times to make sure any debris was removed.

20150117_145637

12 ga. BoreSnake to make sure debris is removed. Will also snag on any obvious jagged edges you missed.

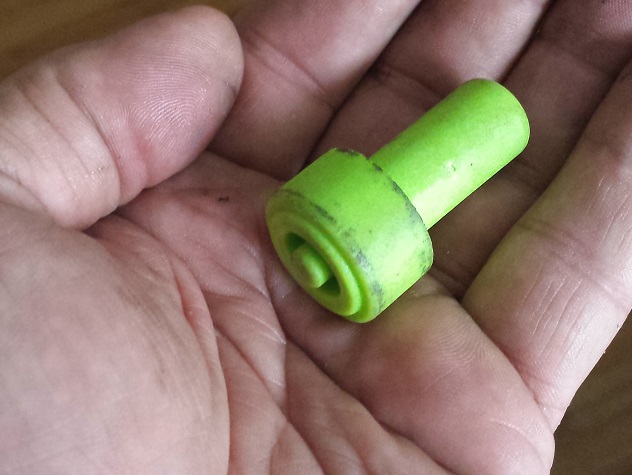
A word about followers. This is the crappy, lightweight, flimsy, plastic, OEM follower Remington sent this shotgun out into the world with. Let’s not sugarcoat it…its a POS.

20150117_145426

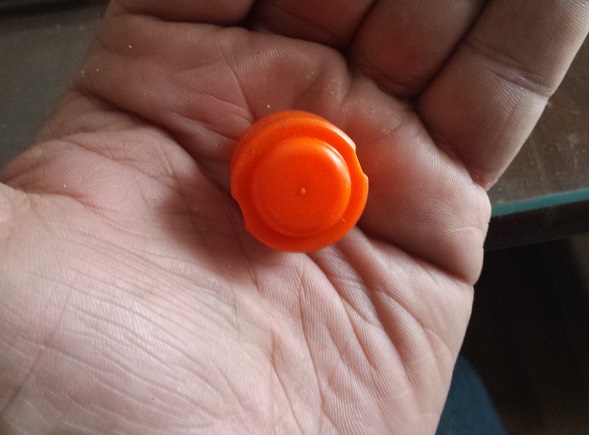
Has the overall quality feel of the little plastic patio table that keeps the box lid off your pizza cheese. Doesn’t instill much confidence.

Other than it being a good, bright color it has nothing going for it. Oh, I’m sure it will work but I want something with some ruggedness, some heft, some substance.

20150117_150921

From Wilson Combat. Still plastic, but much more solid.

Wilson Combat 870 follower. There are some others out there, including stainless steel ones, but I’m comfortable with this one. Some followers have grooves to accommodate the dimples (so they claim). I don’t trust them. I’m sure there is a way the follower can rotate slightly in the magazine tube and then have the grooves not line up with dimples. You’re welcome to put your faith in them, but I’ll settle for a dimple-less mag tube and the peace of mind it brings.

So, once you have the drilled holes polished and smooth on the inside of the magazine tube it’s time to put the gun back together. I’m not going to tell you how..if you got it apart, you should be able to get it back together….if not, plenty of videos on YouTube to show you how.

The next thing, which I should hope you would find obvious, is to test the thing. Go get some dummy shotgun shells and load up the magazine. Cycle through all the shells. When the gun is empty the follower should be visible to show you that the gun is empty.

20150117_151157If the gun has ejected all the shells and you don’t see the follower, that means it is hung up in the tube. Take everything apart and get back to polishing. Also, check the follower for sharp edges as well. I slightly rounded the edges on mine just make sure it would run smoothly up and down the tube. Don’t neglect this function testing. When you’re done with the function test, do it again. And again. I do it about a dozen times because you really can’t have too much confidence in your firearms. When its done, load up the shotgun with your dummy shells and let it sit for a few days, then do the function check a few times again and make sure everything is fine. Once you’re satisfied, go to the range and shoot a case of cheap shells through it to give it a final function check.

20150117_150651

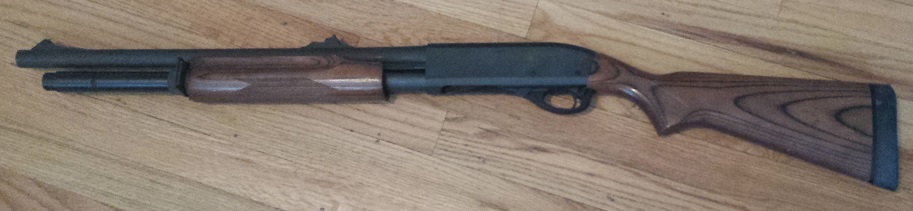
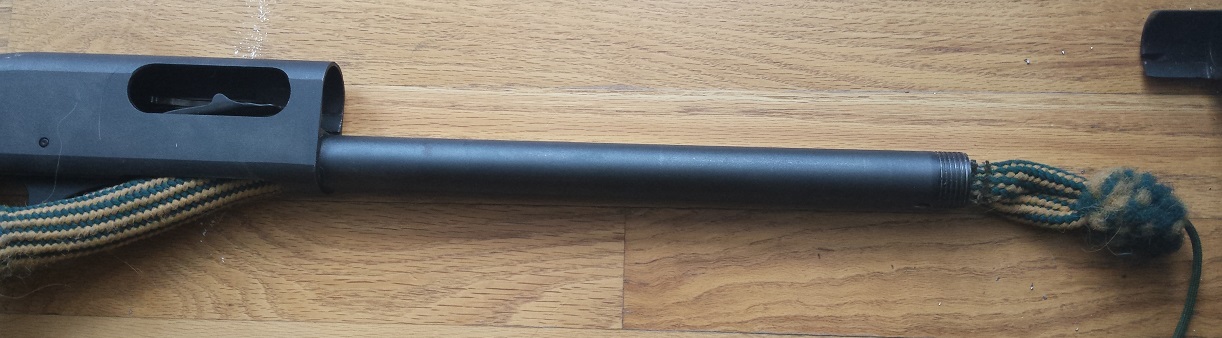
The finished product, exorcised of the dimples. Ready for whatever life throws at it. (Although, realistically, I need to get a rear sling swivel on there.

If you’re buying a used 870, check to see if it has the dimples. There are millions of ’em out there that don’t and if its a choice between two used 870’s, equal in all respects except for the dimples, I’d buy the one without.

Do a pair of holes in the mag tube pose a risk of dirt getting in there? Well, certainly more risk than if the holes weren‘t there. However, the only time the holes are uncovered are when you actually cycle the action of the gun. The rest of the time they are covered by the forend. Honestly, I see it as a non-issue unless I drop the 870 in a sandbox or something.

There you have it – how to remove Remington 870 magazine dimples. Assuming you have a power drill and nothing else, you’ll need:

  • 5/16″ drill bit – about $3.00 for a good one
  • Dremel polishing/sanding drum – probably five bucks
  • 12 ga. BoreSnake – $12 but you should already have one of these anyway

Armed with this knowledge, I urge you to go forth and eliminate the dimples wherever you may find them…until our great nation is again a nation of undimpled Remington 870’s. So say we all.